Friendly Gardening Assistants

It’s time I wrote about our newest house-mates.  We met them in town a few weeks ago –  two blokes and four ladies. They needed food and shelter.  We’d actually been looking for some helpers in the garden, and this bunch was very friendly, so we agreed that they could stay with us.  We squeezed them all in to our van and brought them back to our place. They quickly settled in to their living quarters and helped themselves to food and drink.  Fortunately, we’ve found them helpful and charming so have asked them to board here long-term.  Providing they can do a few things for us in return.

Here’s their job list:

– weed removal

– distributing manure

– scattering mulch

– overseeing pest control

– turning over the compost

– entertaining the kids and teaching them responsibility

– eating some of our leftover food so it doesn’t go to waste

and one special task just for the men…

– waking us up in the morning (in case the kids forget).

I’ll admit, our house-mates are not living in our actual house.  They have a little one of their own.  In the orchard.  It’s an open-plan house with a miniature drawbridge style door and an upper level where they rest at night.  We close their door once they’ve settled down for the evening.  And open it for them first thing in the morning.

Our new friends are doing some wonderful work here.  So far they’ve fulfilled all their tasks on a daily basis.  Though on several occasions, I’ve had to politely move them on from certain areas of the garden where they’ve been a little overzealous with the weeding and scattering of mulch.

The girls also promised they’d produce tasty, nutritious morsels for us on a regular basis.  They said they’d start as soon as possible.  But so far only the oldest one has come through with the goods.  And only on three occasions.  I suspect the others need to grow-up a bit first.

Thankfully the men have been spot-on with their timing by not waking us before sunrise.  Actually it’s only the one fellow who’s been producing the morning wake-up call.  The other is still quite youthful and perhaps needs a sleep-in.  We were quite reluctant to have two males living under the one small roof at first – we didn’t want any fights breaking out, you see.  But we have ended up with two and they’re getting along quite well for now.  If there’s any trouble though, we’ll be finding alternative accommodation for one of them.

The kids have really enjoyed watching our helpers at work and following them around the place.  Miss Five often opens up their quarters in the morning and delivers some of our leftover food from the night before.  They appear to really appreciate this extra meal at the start of the day.  If the manner in which they scoff the food down and push each other out of the way to access it, is anything to go by.

We’ve become particularly fond of one of the girls.  She’s clearly had a very loving, attentive upbringing and is gentle and affectionate, yet sociable, and loves to come up to the house for a chat.  She’s formed a special bond with Miss Five, too.  Her name is Lulu.  She’s pretty, don’t you think?

IMG_7579


IMG_7424


2 Comments

Filed under Growing the Garden, Living Green

My Rusty Garden

I’ve said it before, that one of the appealing things about having old stuff around the place is the associated nostalgia.  It gives me a warm, happy feeling.  Which is a very good thing.  An anodised aluminium teapot that I keep on the slow-combustion heater for hot drinks in winter, sparks memories of Sunday morning tea after church in the hall.  And of the old (perhaps they were not very old, but I was just a kid back then) ladies who poured cups and cups of tea into proper tea cups, for me to drink with my biscuits.  When I fill one of my brightly-coloured anodised aluminium cups for a guest, I recall drinking cordial in Grandma’s kitchen.  And I’m taken straight back to my great grandmother’s sunroom when I sit in an old white wire patio chair on the verandah.  So around my garden, to add to the cheer that being amongst plants and nature brings, I’ve incorporated old furniture items that made me smile when I discovered them.

IMG_7200

Since there are various animals living outside at my place, as well as young children about, decent fences are rather important.  And fences need gates.  Just an excuse to obtain more lovely vintage items really!  When it came time to fence our property, my husband and I drove across the countryside to collect old gates that we’d purchased on ebay and at our local second-hand auction centre (OK we didn’t have to drive that far…I don’t want to sound like we were racking up the fuel miles).  They added instant character and charm to the garden.  And now when I wander around outside or open a gate I remember walking along the footpath to school, looking in to front yards and admiring the lovely country gardens.

IMG_6976

IMG_6994

IMG_6988

IMG_6987

We also have lots of chairs outside and around the garden.  I have a thing for chairs.  Not that I get the chance to sit on one very often.  But when I count how many old chairs there are at my place I realise I’m a bit of a chair collector.  They are very useful at least.  And all are carefully placed.  So if you ever happen to visit, you can be sure you’ll find somewhere to sit, inside or out.  You’ll notice with these old cast iron chairs that they have lost a bit of paint.  That is the state that I bought them in.  And that is how I like them.  Otherwise they might look too new.

IMG_5494

Despite appearances, this one is still going strong and is actually very comfortable.

IMG_4915

And on the verandah (the lovely antique wicker chair was a thoughtful birthday gift from my mum)…

IMG_7198

IMG_7199

Tables are useful, too.  This is my favourite.  I wouldn’t dare paint it.

IMG_7197

IMG_4914

My vintage pot plant stands remind me of my grandma’s back door steps.  Hers was likewise laden with succulents.  And the miniature jade (Portulacaria afra) on the centre shelf originated in her mum’s wonderful garden.

IMG_7201

Note the rust.  Rust is good.

IMG_7202

I just liked the look of this one – a vintage bird cage holder.  I prefer to keep plants in the bird cage (which is actually not that vintage but I did buy it second-hand and it looks the part I think).

IMG_7187

It is just as well I have a large garden to house all this old furniture.  As my garden grows and changes, my collection of old stuff evolves with it.  And more memories are created.

4 Comments

Filed under Growing the Garden, Living Green

A Few of My Favourite Plants

My gosh I didn’t expect to have another prolonged break from my blog. But now that the craziness (but nevertheless awesomeness) of Christmas is out of the way, the Event of the Year (my big sister’s wedding) has occurred and was absolutely breathtaking and beautiful, and some other stuff has been ticked off my long list, I can get on with things in the blog department.

Aside from these other activities, I’ve been spending quite a bit of time in my old garden again. It’s one of my favourite places to be. And it’s also my thinking spot. Though the thinking doesn’t happen very coherently with a toddler and preschooler constantly butting in. Nevertheless when I was out in the garden the other day I thought: ‘I really, really need to write a blog post.’ And at the same time I was feeling some plant love. Which gave me an idea for this post: a spiel about my favourite plants in my garden. I don’t mean my favourite plants in general. I’m talking about plants that are useful and easy to grow or to propagate, in a permaculture-type garden (and in my temperate, almost subtropical climate in Australia). Some are edible and some are not. And others might be classified as ‘edible’, but I wouldn’t eat them unless I was starving on a desert island and they happened to be growing there.

Firstly I’d like to point out that I only have formal qualifications in animals, not plants. So don’t take my word for it. But I have been a gardener for a long time and I have spent many hours reading gardening books and magazines and watching gardening shows on telly (I think Kosta and Peter are pretty special – my apologies if you live outside Australia and haven’t the vaguest clue who Kosta and Peter are but trust me, they’re gardening heroes in my neck of the woods).

Here’s my list:

Queensland Arrowroot (Canna edulis)

Arrowroot is an attractive plant with large, green leaves and occasional (but beautiful) scarlet flowers.  The leaves are used for animal fodder and mulch.  The plant produces a large tuber, which can be cooked and eaten in similar ways to potatoes (roasted is my favourite) and also made in to flour.  (Although I’ve heard the rewards are disproportionate to the effort with regard to the latter.) It is the tuber which is planted and divided for propagating (too easy).  Like all good Queenslanders, arrowroot is remarkably tough and likes a warm climate. I recently had a bucket full of tubers sitting out in the hot weather for a couple of months yet they were still producing new shoots.  I planted them two weeks ago in the most horrible, compacted, dry (due to lack of watering) clay soil and the plants have already shot up to 20-30cm above the ground. So although they apparently like fertile soil and ample water (even waterlogged areas) they survive with sheer neglect.  Despite this I haven’t found them to be weedy perhaps because their spread is slow and the plants can easily be removed by way of the large tubers. Actually, when planted en masse and in a row, arrowroot can act as a weed barrier and will also protect other plants from wind and sun.

Comfrey (Symphytum Officinale)

Comfrey is one of those plants that gets me excited.  If you were to judge it on outward appearances you might think it was a nasty, prickly weed.  But it is wonderful and produces the most nutritious organic matter for the garden, by way of mulch, compost or liquid fertiliser (just add water and a few weeks).  Comfrey can be eaten in moderation, and is particularly beneficial for chooks.  I’m yet to sample the infamous comfrey fritter, though. There seem to be two schools of thought on its gastronomic merits: one that says it tastes just lovely, with a slight fishy flavour (which does nothing whatsoever to tempt me) and another that says don’t even bother! Comfrey is another robust plant and after being cut back, the leaves will regrow in a matter of weeks depending on the time of year (about 4 weeks to reach maximum size in the current warmth of summer at my place).  If planted close together it can be used as a weed barrier, for example, along the edge of a garden bed. Once it is planted in a particular location comfrey can be tricky to remove, as the plant will regrow from any little pieces of root that remain in the soil.  So plant it in a spot where it’s welcome to stay for a long while.

IMG_6721

Lemongrass (Cymbopogon species)

Another excellent mulching plant which is also hardy.  It grows to around 1m high and forms a large clump.  The plant is easily propagated by dividing up the clump or digging out smaller sections of roots from the main plant then replanting those.  Because of the strong clump that is formed, lemongrass can be a useful edging or barrier plant, to stop weeds getting past or to act as an informal border to a garden bed. It is happy with average soil and little water.  And I don’t think I need to inform you of its fabulous culinary reputation!

IMG_6911

Tamarillo (Cyphomandra betacea)

Tamarillo is a small, fast-growing tree that produces a bounty of delicious fruit of the same name.  I usually describe these as being a cross between a tomato and passionfruit.  Tamarillo trees begin fruiting within two or three years of planting, but only live for around five to seven years. So it’s generally recommended to plant more trees every three years.  They can be grown from seed (very easy to collect) or cuttings.  They are a must-have fruit tree for a warm climate.

Blueberries (Vaccinium species)

We planted nine blueberry bushes along the front of our house when we first moved here and now I consider that a wise investment. They started fruiting for us in their second year, and since then we have picked bucketfuls of berries each spring.  The bushes grow quickly and are relatively resistant to pests and diseases but they do need reasonable watering and regular additions of organic matter to produce yummy berries. Mine conveniently live adjacent to the comfrey row, so every now and then I simply pull off gloved handfuls of comfrey leaves and pile them around the base of each bush.  And since they like acidic soil, they get treated to our coffee grounds, too.  A plant that likes coffee has got to be super cool, don’t you think!? But one of my favourite things about growing my own blueberries (or any berries for that matter) is that it saves me from buying them in little plastic containers.  And I can eat handfuls of them at a time without feeling guilty about over-spending! Of course birds like to eat beakfuls of them at a time.  So you might want to cover them with a wildlife-friendly netting, such as Vege Net, which I purchased from Green Harvest. It ensured we actually had some blueberries left for ourselves this year.

Nettie's iphone 016

IMG_6073

Salvias (Salvia species)

Of all the flowering perennials I have a soft-spot for the salvias.  I grow several varieties around my garden and they never fail to give me a warm, fuzzy, plant-loving feeling.  Salvias are drought tolerant and grow quite fast and easily from cuttings. I have been known to just stick a salvia cutting into the ground rather than bothering with a pot; that’s how readily they produce roots. So if you haven’t propagated plants via cuttings before, salvias are an excellent starting point.  Salvias are useful for attracting beneficial insects such as bees and for just looking pretty. Many are also culinary herbs – common sage (Salvia officinalis) is probably the most widely known.  My favourite though is pineapple sage (Salvia elegans) because it does actually smell and taste of pineapples (perfect for adding to cool summer drinks) and produces a gorgeous scarlet flower for much of the year.

Nettie's iphone 423

IMG_6920

IMG_4901

IMG_4899

Here is a list of some other plants that I reckon are fabulous to grow in an organic or permaculture-style garden:

  • Gourd (Lagenaria siceraria) – grows from seed, on a vigorous, annual vine; the fruit can be eaten when small but I like to let them grow into giants that become unique ornaments and vessels when dried.
  • Luffa (Luffa aegyptiaca) – grows easily from seed on an annual vine.  And yes you can make your own luffa scrubbers with the fruit!  One plant will provide you with enough luffas for a few years, depending on how much you utilise them.  Not only are they fabulous exfoliators, they also make useful compostable cleaning scrubbers eg,for washing the dishes.
  • Nasturtium (Tropaeolum majus) – self seeds readily but not too far from the parent plant because the seeds are quite large. A pretty ground cover with a long flowering period.  The flowers are a lovely addition to salads and the green seeds can be pickled and eaten as a caper substitute.

IMG_6915

  • Aloe (Aloe vera)- I keep this handy in a pot on the verandah, ready to break open a leaf and apply the magic soothing gel as required to insect bites and minor burns.  It actually appreciates being sheltered from the sun in summer so being near the front door suits us both. Being a succulent it tolerates minimal watering.

IMG_6924

  • Globe artichoke (Cynara scolymus)- a survivor and easily propagated by dividing plants.  And of course absolutely delicious!

IMG_6919

  • Rosella – heat-tolerant and easily grown from seed.  Makes the best jam you will ever try!

Nettie's iphone 157

  • Scented geranium (Pelargonium species) – scented geraniums are easily propagated from cuttings, hardy and drought-tolerant with pleasant fragrances that vary amongst the species.

IMG_3908

  • Coneflower (Echinacea species) – coneflowers are survivors and their flowers are just divine. Excellent bee-magnets!

IMG_6936

If you live in Australia, I realise now is not the ideal planting time by any means.  Many parts of the country have been getting sizzled by the heat for the past week and I’m sure there’s more of that to come.  And I’d imagine if you reside in the northern hemisphere now might not be a wonderful time to plonk innocent seeds or vulnerable cuttings into the soil either.  Nevertheless I hope I’ve given you some ideas for planting in the upcoming milder seasons.  Bring on Autumn and Spring!

4 Comments

Filed under Growing the Garden, Living Green

Softies for Mirabel

Hello friends!  I’ve been away from this particular screen for a long while.  Moving house (back to my old place…hooray!), and still unpacking and organising (mostly solo with the addition of two pairs of small helping hands) being the major excuses.

IMG_6222

Anyway, this is intended to be a brief post as I’m exhausted after celebrating Miss L’s fifth birthday with a wonderful farmyard-themed birthday party (more to come on this soon I hope). I have just packaged up this year’s contribution to Softies for Mirabel, ready for her journey to Melbourne tomorrow.  She is a softie doll named ‘Sophie’ who I created several months ago using vintage, reclaimed and remnant fabrics, 100% wool felt and recycled polyester stuffing.  Sophie has her own sleeping bag and pillow, which might come in handy for the trip I guess.  

image

Somewhere there is a child who is going to meet Sophie and hopefully become her pal, some time after Christmas.  Thanks to the work of the Mirabel Foundation, an organisation based in Melbourne, that assists children who are affected by parental substance abuse.  The toy drive was the brainchild of the totally awesome, Pip Lincolne of Meet Me at Mikes.  Crafters from across the globe send in their handmade (sewn, knitted or crocheted) toys which are then matched to a Mirabel child for Christmas.  Last year I sent a toy in for the first time – a cat named Ginger.  He was based on a design that my daughter drew when she was three.

IMG_1922

I had planned to write this post to promote the 2013 Softies for Mirabel toy drive.  But I’m a tad late.  I only discovered tonight that the deadline for posted toys to be in is November 30 (Sophie should just make it)!  Anyway, that should give any crafty types who are reading this plenty of time to whip up a handmade toy for next year.

2 Comments

Filed under Green Craft, Kids Stuff

Bird Friends in the Garden

My poor little blog has been somewhat neglected of late.  Sorry about that.   My body and mind have been exhausted by Master J developing into a spirited and energetic toddler.  Nature’s plan for female humans to begin reproducing in their teens is  completely logical in hindsight.  I certainly could use some of my teenage (or even twentage) energy and physical condition in keeping pace with my one-year-old.  And four-year-old for that matter.  But then I suppose at thirty-something I have gained extra wisdom to help me get by.  Maybe.  I sure could do with more strength and vitality though.  Anyway.

Much of my time and creative thoughts have been taken up by a challenging bathroom renovation that is happening at my old abode.  More on that later I hope.  (Sooner rather than later would be good.)  But it’s actually this recent project that has led me to the topic of this post.

I’ve been spending many weekends at our semi-rural bushland property due to the reno (if you read about my blog you’ll see we’ve been separated for a short while…soon to be permamently reunited though…yay)!  We’ve been blessed with some charming weather.  And invariably along with that descends the feathered friends brigade!

These shots were all taken last Sunday on my iPhone.  First I was greeted, upon opening the blinds at 7.30am, by a gang of six sulphur-crested cockies and corellas.  I’m not sure why they had come together.  But there they were having an early morning party in our back garden.

IMG_5215

Later and throughout the day we were entertained with the antics and laughter of our resident kookaburras.  At one time there were five sitting around the front garden.  This youngster was courageous enough to venture so close that I could almost touch him.  In Australia we often take these iconic birds for granted.  But when given the chance to observe them close-up I get tingles down my spine.  Have you ever noticed how they can sit perfectly still watching from a vantage point and then in a flash retrieve a wriggling earthworm from the soil?  Or heard them chatter to one another quietly and quite different to the typical laughter that they are reknowned for?  Ever looked a kooka in the eye, front-on?  What an adorable sight.

IMG_5217

And finally our other special visitors.  The butcherbirds.  One of my favourite bird species. Not so much because of appearances, although I do think they’re beautiful to look at.  Not for their dining habits, although they are very clever in that regard.  But if you ever hear a butcherbird sing you cannot help but be entranced.  The sound is clear, melodious and could easily have floated out of a human-made instrument.  It gets me every time.  Last weekend it was seeing them so close that gave me a thrill.  Several of them appeared on the verandah while we were eating lunch.  And yes, they were being hopeful.

IMG_5216

We also had visits from the wood ducks, red-rumped parrots and noisy miners.  But we have many more bird species utilising our property, which we were once planning to name ‘Bimbadeen’ – an aboriginal word for ‘place of many birds’.  Until we realised it’s not a particularly unique property name.  (Google it and see for yourself.)

Here are some older pics of bird visitors at our place.

A pair of eastern rosellas on the fence.

eatern rosellas

A young grey butcherbird.  So sweet.

Nettie's iphone 422

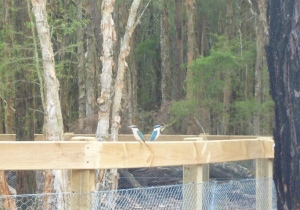
Sacred kingfisher couple.

P1010615

My pleasure in having wild bird company is enthusiastically shared by my kids.  Whenever he spots any variety of feathered friend, Master J is quick to produce his generic bird call imitation, together with a repeating sign-language gesture (tapping pointer finger on thumb to resemble a moving bird beak).  The infamous Indian Myna isn’t even spared such excitement.  And Miss L at four can already identify and name many more birds than the average Australian.  As well as being able to use her ears to determine what birds are about.

Pondering all this reminded me where my love of birds and the ability to identify them originated.  I spent many a camping trip or bushwalk as a youngster, creeping about the bush with my mum, oldest brother and sister, binoculars at the ready and bird book on hand.  The treasured binoculars, which I still own (despite the existence now of far superior models) were one of my earliest birthday gifts (I think I was six or seven) and they were proper adult ones.  Not a toy version like the pair Miss L has.  I was pretty thrilled to be trusted with using and maintaining such a special piece of equipment.  (And of course the binoculars were not only used for spotting birds.)

I realise that bird-watching is not a hobby that’s enjoyed by the masses.  You discover that fact quickly when you are frequently the only person around who doesn’t call every black and white bird a magpie or when others are surprised by your ability to make a distinction between a cockatoo and a corella.  Bird-watching is  perceived by some to be a pretty nerdy past-time too.  But Bill Oddie is an avid bird-watcher!  So it has got to be one of the coolest activities around.  Right?  He was always the hip one after all.

The whole process of seeking and identifying wild birds is just the perfect activity for kids.  For a start it gets kids outdoors.  It invites adventure but also teaches patience and listening.  It helps kids learn to appreciate fine details and subtleties of an image, to differentiate colours and patterns, and distinguish shapes.  Since bird-watching also incorporates bird sounds, it develops the sense of listening very well.  There might be three or four different bird calls going on at once, but a bird-watcher learns to discern that one call and put a name and face to it.  It’s a calming, quiet-time activity.  We need lots of those up our sleeve as parents.  And it involves challenge and achievement so it’s fantastic for kids’ self esteem.

If you’ve never done any bird watching before go on.  Try it. With your kids.  No matter how young they are.  Grab a bird book.  It doesn’t have to be the latest flash one…bird names haven’t changed that much over the years.  I bought mine from the local charity store as you might have guessed.  Get yourself a pair of binoculars if you’re keen.  Though to start with, especially with young children, you don’t need them.  Go outside!  Even the most urban areas in Australia have birdlife so it’s not a prerequisite to be in the bush.  But if you are that’s wonderful.

For some fabulous advice on bird watching as well as some excellent resources, check out the Birds in Backyards website.  (Note: this is an Australian website, so it mostly relates to Australian birds but it does have general bird-watching advice too.)  My best tips?

– Practise being still and quiet.  Not only so you don’t frighten the little birdies but also to help you hear their calls and movements.  Challenging for kids at first but you’d be amazed how easily this can be achieved once they realise the reward.  Whispering and using hand signals to communicate when you’re on the bird hunt also adds to the fun.

– Observe a bird for as long as you can so you get to appreciate its size, shape, beak appearance, colours, patterns, calls and behaviour.

– Familiarise yourself with groups of birds and their features (eg, parrots, owls, wrens, kingfishers, honeyeaters).  This will help when it comes to searching through pages for that one feathered friend amongst hundreds.

–  Get to know your bird book.  Most are divided into sections, with the first part usually providing very useful general information about bird identification and also a key to the different bird families.

– Take note of your location and utilise the distribution maps in the bird book.  If you see a kookaburra in southern Australia it’s not going to be a blue-winged kookaburra unless it’s in an aviary.

– Keep a record book of birds you’ve identified.  Kids will love this part.  Keeping tabs on things is a favourite past-time of most kids.  Younger kids can include drawings or photos.

The Birds in Backyards website keeps tabs too…on what birds are hanging around urban Australia.  By becoming a member (no fee required) you can participate in some important surveys.  Trust me it’s easy.  And very rewarding.

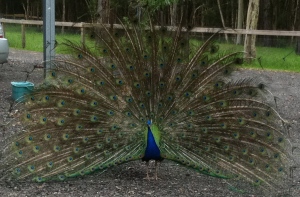
Finally, here is a bird who you won’t need a book to identify: our non-native neighbourhood peacock (Mr Peacock to friends) who makes periodic appearances in our garden and never fails to put on a show.  What a stunner.  If anyone can inspire you to take up bird-watching with your kids, Mr Peacock can.  Surely.

Nettie's iphone 504

Nettie's iphone 564

2 Comments

Filed under Kids Stuff, Living Green

Handmade Gifts of Crochet Love

Over the past few months I seem to have given myself the challenge of creating any gifts that are given by me or my family.  There has been a run of birthdays including those of Miss L’s preschool classmates, family and friends.  Plus a new baby here and there.  So I’ve been busy.  Here’s the list thus far:

softie teddy

lavender eye pillow

lavender hand balm

two super hero costumes (plus an extra set for Miss L …the prototype actually)

two softie bunny-type creatures

half a dozen crochet hens’ eggs, and

two sets of crochet headband, wristband and brooch.

This is the one I just finished for my daughter’s little friend who’s turning five tomorrow.

IMG_4963

I’ve certainly been doing my share of crochet lately.  As I have said before I find it therapeutic…relaxing…satisfying.  I had already made a few of the little flower headbands for Miss L, but with 8 ply acrylic yarn.  I love the natural, crisp look and feel of cotton though.

The handy thing about small creations like these is that yarn leftovers can be utilised.  In this case it was someone else’s leftovers purchased by me on ebay.

P1010230

To make the bands for the headband and wristband I used a very simple crochet pattern called ‘up and down stitch’, which features treble crochet (US double) and double crochet (US single) in alternating stitches.  My recent discovery of this, and plenty more patterns in my vintage copy of Reader’s Digest Complete Guide to Needlecraft was a delightful moment.  I felt rather ashamed that I hadn’t looked at it sooner, especially because my mum had lovingly given it to me a couple of years ago.  To think that I’d been scanning the pages of Pinterest rather than handling the leaves of a humble book that was at my fingertips all along!  My grandmother would shake her head.  Anyway, here is the pattern:

Chain a multiple of 2 ch plus 2 (I couldn’t work out why this isn’t just a multiple of two…perhaps it’s acknowledging that the length is the multiple of 2 ch, not the plus 2 bit as well?)

Row 1

skip 2 ch, 1 dc (US sc) in next chain, *1tr (US dc), 1 dc *, 1tr, ch 2, turn

Row 2

skip 1st tr stitch, *1 tr in dc of previous row, 1 dc in tr of previous row*, 1 tr in ch 2 of previous row, ch 2, turn

Rep from Row 2

P1010229

I used a 4 ply cotton and 3.5mm hook for both the headband (100 chains long) and wristband (34 chains long).  Obviously your chain length will vary depending on the size of the recipient (in this case, a five-year-old girl).  Both the wristband and the headband are about 8 rows wide (I forgot to write this down so I’m not certain…but just make it to your desired width)! To join the ends of the headband strip I overlapped them slightly and hand sewed together using the same cotton.  I found that the up and down stitch of this width produced a pattern with two tiny holes at the ends of the band – perfect button holes, which I utilised for fastening the wristband!  (Alternatively you could create button holes by skipping a few stitches where you want your button hole and just chaining for this tiny section instead; or making a little chain loop at the end of the band.) Then two little buttons were stitched to the other end.

P1010228

The sweet but simple flower pattern was courtesy of the very generous Scrapbooking and Cards Today Mag blog.  (Note that this pattern is written in US terminology.  ‘Double crochet’ (dc) equals ‘treble crochet’ (tr) in Australia and the UK, and ‘single crochet’ (sc) equals ‘double crochet’ (dc) in UK and Australian terms.)  By varying the size of the hook and yarn, you can make different sized flowers.  The largest hook I used was 4.0mm the smallest was 3.0mm and the yarns were 3-4ply cotton.  For the other headband set I also used a 2 ply cotton with 1.75 and 2.0 mm hook and these flowers turned out very sweet (great for the smaller flowers on the brooch). The little purple flower was created by mistake.  Instead of six trebles (US dc) for each petal I did six double crochet (US sc).  But it turned out just right for the upper flower part of the brooch.

P1010226

You can combine the flowers in whatever way you choose.  For example, you might like two of different size and colour for the headband or three for the brooch.  And you could put button centres on the headband and wristband too.  All flowers were hand-sewn on to the bands or to each other using the same cottons (I actually used the tails in most cases).  The little button was secured to the crochet flower beneath it using cotton thread.  To finish off the brooch I sewed a small gold safety pin to the back with cotton yarn.

P1010227

And as a final touch I added a little card  with Miss L’s two striped cats drawing.  (I couldn’t resist having it converted into a stamp…to Miss L’s amazement.)

P1010224

Together with some good old-fashioned type-print from my old-fashioned friend.

P1010236

We shall find out tomorrow if Miss Turning-Five likes her gift!

6 Comments

Filed under Green Craft

Home for the Holidays

IMG_4687

I couldn’t resist including a little typewriter love in this post – a packing list for last week’s holiday.  To my old house.  Sounds exciting doesn’t it!?

An odd list of holiday necessities it would seem.  Secateurs?  Boxes of cushions? Actually it wasn’t exactly a holiday.   The purpose of our trip was to make preparations for our eventual return to our property and for the arrival of a special house sitter.  There was lots of work to do.

But there were lots of sweet surprises to be had too.  Like the abundance of flowers in my garden despite the fact that it’s winter.   My resourceful preschooler set about collecting them (edible ones only) to make various exotic teas.  (Nasturtium or calendula tea, anyone?) I showed her the delightful red pineapple sage flowers and hinted about their sweet nectar contents.  Needless to say Miss L kept herself occupied with those for a long while.

nasturtium

Our old vintage rocking horse became a surrogate pet for the week.  ‘She’ was lavished with various garden treats including nasturtium leaves and flowers, of which we have an abundance.  Thanks to my nasturium planting method of throwing handfuls of seeds onto the general designated area and hoping they will eventually germinate.  And of course now they self-seed quite happily.  This could be a problem. But I’ve noticed that as the seeds are too large to be dispersed by wind (they’re about pea size) they tend to fall close to the parent plant rather than spreading all over the garden.  Which is very good of the nasturtium.  (In contrast to the lemon balm which I mistakingly planted in a front garden bed and now discover popping up anywhere there’s a bit of soil.)

IMG_4806

While Miss L was busy with plants and animals I found myself taking pseudo-holiday snaps in between wiping out the kitchen cupboards, unpacking boxes and blindly assembling the timber bunks which I bought second-hand on ebay.  ‘Blindly’ refers to the fact that the bunks came minus instructions…so it was a joyful exercise.  As you can imagine.  (And thank you, Mum, for your amazing dedication, perseverance, and skill.)

The sunny calendulas below were shot in a hurry – those little feet were  getting into a suitable position for flower-picking.  I had to be quick!

IMG_4805

This bright but delicate fungus was growing on a timber log that informally edges the front garden.  It was quite tiny.  But look at that colour!  Nature is incredible, isn’t it?

IMG_4804

And this beauty was  in a pot amongst the other orchids that were given to me by my mother-in-law a few years ago.  Living in absolute neglect.  What a perfect welcoming gift from my home itself.

IMG_4780

Leave a comment

Filed under Growing the Garden, Holidays in Nature

Typewriter Love

20130702-233326.jpg

I received a new toy in the post today. Well. It’s clearly not new. But hey, I haven’t used a typewriter since tapping the keys of my mum’s 1960’s Olivetti Lettera 32, back in the eighties. So to me it’s as good as new.

And it seems to be working fine so far. But I must say that ‘tapping’ is hardly the correct description to use in reference to pressing down the keys of a vintage typewriter. If one merely taps on a key one can barely get the key to make contact with the ribbon. ‘Bashing’ is more apt. Perhaps before modern computers, smart phones and pads, tapping was an acceptable word. Before we really new what it was like to literally tap out a few words with our fingers.

Today after testing the keys to make sure they truly are in working order, I announced to my mum (via a tapped out text message on my smart phone): ‘How you ever typed fast on a typewriter is beyond me’. Mum could type fast. Lightning-fast it appeared to me when I was a two-finger-tapping…make that ‘bashing’…youngster.

Anyway, I didn’t make my new purchase to assist with my typing speed. I decided I’d like to use a typewriter to produce little labels for some of the softies and such that I create. I thought genuine typewritten cards would be a nice touch. As opposed to just using a computer typewriter font and printing them.

So I’ve been searching online lately and eventually found this Olympia Splendid, apparently from the 1970’s. I didn’t pay much for it. I bid on ebay and was the lucky winner. But golly gosh. I could have paid lots and lots for an old typewriter. During my recent typewriter quest I discovered that people will pay big money for old typewriters. Even if the machines are not in working order. Antique stores, online or not, seem to charge no less than $100 for anything from the 70’s or older. Mostly closer to $200, and of course the asking prices go well above that especially for any that hail from the first half of the 20th century. On ebay it’s easier to snap a bargain, but most of the starting bids for vintage typewriters are set at $60 or more! Plus delivery.  I settled for something that was still clutching on to it’s youth, and in working order. But without an exorbitant fee.

20130703-003054.jpg

There’s something really appealing to me about vintage typewriter typeset. The imperfection. The rawness. The nostalgia. And to enrich this appeal is the existence now of different coloured typewriter ribbons. My excitement on discovering not only green and blue but pink…yes!..and purple…no?!…was perhaps a slight overreaction! But isn’t that brilliant?!!

My intention was to type out this post on my splendid new typewriter.  And then scan it.  I thought it would look quite cool.  But the problem is a typewriter wasn’t intended to use when everyone else in the house (particularly easily woken babies) is asleep.  And when everyone else in the house is asleep happens to be the only chance I have to write my blog posts (without distraction).  I also wanted to finish the post before the end of the year.  So I had to settle for the above photo.

I might just become an obsessive vintage typewriter collector yet. Like this fellow in Canberra. Amazing.

But for now I’m going to get re-acquainted with an old friend. Not that old, really. But old enough to be vintage. Just like me. I think we’ll be happy with each other.

2 Comments

Filed under Living Green

Upcycling: Puzzle Piece Kids’ Clothes

IMG_4404

I made these trousers for Master One the other day.  Well.  I kind of cheated.  You see, my little boy has become a turbo-charged tank, crawling around the place like he’s on a serious mission.  His delicate baby clothes are being tested for toughness every day.  And they’re not doing too well.  In the toughness department, that is.

When his first pair of trousers developed a pair of holes, I was tempted to convert them to rags.  The upcycler in me knew better.  I cut off the holey knee sections of the trousers , leaving the top waist/bottom part (the red, top in the photo above) and the two trouser-leg bottoms (red trouser bottoms in photo).  I replaced the removed pieces with sturdy but soft fabric from my old corduroy jeans.

To minimise my sewing I cut the old jeans fabric to include the original inner-leg seams.  Then it was just a matter of cutting the width to match the original baby trousers pieces, with allowance for the outer-leg seams.  I matched the pieces together with right sides facing, sewed up the seams and zig-zagged the seam edges to finish.  Very simple.

Unfortunately I didn’t snap any pics of the process.  But I’ve started on some other kids’ clothes puzzle-piece mix ‘n’ match projects and photographed the cutting up and piecing together steps.

Baby jumpsuit becomes a shirt/jacket (I’d already cut the feet off these a while back thinking they could become a footless jumpsuit then discovered some holes in the legs, around the buttons).  I just need to hem the bottom.  

IMG_4394

IMG_4393

IMG_4395

Pyjama (long) bottoms become pyjama shorts or undies (post-nappies).  Again a simple matter of hemming the bottom edges.  (Look at those holes in the legs!  Some heavy duty crawling has been going on here.)  There will be a use for the non-holey parts of the leg bottoms too.

IMG_4400

IMG_4401

IMG_4402

More of Master One’s handiwork – stains and holes again (see second photo).  Plus they were a bit short.  I’ll join them to the bottoms of the grey trousers to make a new pair with longer legs.

IMG_4397

IMG_4398

(Woops I’d already discarded – cut up for stuffing – the removed crutch section of these grey trousers before taking photos. They belonged to Miss Four before she wore some holes in the rear!  I’d attempted a repair initially but it came apart after one wear!)

IMG_4396

IMG_4399

This final one might be interesting.  But I’ll see how it turns out.  I actually cut the grey  women’s T-shirt up to make T-yarn (the centre piece was used to make this) so was left with some scrap fabric which I cut up for the skirt below.  The pink T-shirt fabric was also left over from making T-yarn.  I’ll try to piece them together with the top of the grey trousers from the pic above.  

IMG_4403

IMG_4405

IMG_4406

IMG_4407

Hopefully the overlocker for which I’m excitedly waiting, will make the joining together of these stretchy fabrics much easier.  I’ll post some photos of the finished pieces when I’m done.  Just to show that they don’t look totally ridiculous.

1 Comment

Filed under Green Craft, Kids Stuff

A Few of My Favourite Green Things

I just wanted to share some of the eco friendly products that I use and find fabulous.  In this age of the eco-conscious consumer (I like to think of it that way…perhaps I’m a little optimistic) I’m often amazed by the availability of green product versions.  Since I live in Australia, the products I use tend to be Australian, or from as close to home as possible.  If you live overseas, you probably have some different but similar eco products at your fingertips.  I’ve discovered that it always pays to search online for eco friendly versions if I’m after a new item.

1. Soapnuts: I love these!  Nature’s soap that grows on a tree.  Soapnuts are berries that contain saponins.  They grow wild in the foothills of the Himalayas.  Locals collect the fallen berries, remove the seeds and dry the shells (which contain the saponin) in the sun, then ship them off to the sellers in Australia (and other countries).  It’s a completely sustainable and fair trade practice.  Soapnuts do an awesome job of cleaning your laundry, body, hair, dishes and home.  Then onto the garden or compost they go.  Wonderful.

Soapnuts

Soapnuts (picture credit: wildsoapnuts.com.au)

2. The Environmental Toothbrush: A completely biodegradable (it’s compostable) toothbrush made of sustainable Moso bamboo and designed by an Aussie dentist.  They come in adult (medium and soft bristles) and child sizes and compare favourably in price to regular toothbrushes, that are made from petrochemicals and end up in landfill.  If you prefer plastic, then check out these toothbrushes made by Preserve in the United States, from recycled plastic.  The company also offers a recycling programme and sells a range of recycled plastic kitchenware and tableware.  I love these, but tend to favour the bamboo toothbrushes as they’re made closer to home and have a beautiful, natural look and feel.

The Environmental Toothbrush

The Environmental Toothbrush (photo credit environmentaltoothbrush.com.au)

3. Tread lightly on the planet with a pair of My Honeybees sandals, and help save precious bees at the same time.  Made of 100% recycled rubber these sandals come in an array of gorgeous colours and their sale helps support the work of Aussie CSIRO scientist Dr Dennis Anderson and his Bees Downunder Foundation.

My Honeybees Sandals

My Honeybees Sandals (photo credit: myhoneybees.com.au)

4. If you’re a straw-y kind of person then try a reusable glass one from Glass Dharma.

Glass Dharma Glass Straws

Glass Dharma Glass Straws (photo credit: glassdharma.com)

5. Makedo: a clever connecting system for making stuff out of trash.  They are completely recyclable too.  I love Makedo so much I have a page dedicated to it on my blog!

Makedo

Makedo system (photo credit mymakedo.com)

6. Ecotools: a large range of cosmetic brushes and bath tools made with environmentally friendly materials including bamboo and recycled aluminium.

Ecotools make-up brushes

Ecotools make-up brushes (photo credit: ecotools.com)

7. Ecocern: the most eco friendly recycled paper available in Australia.  It is non-bleached and made from 100% post-consumer scrap paper, in Australia.  The range includes cardboard and envelopes.

Ecocern recycled paper

Ecocern recycled paper (photo credit ecocern.com)

8. Full Circle: cleaning brushes and sponges made from eco friendly materials including recycled plastic, bamboo and cellulose.

Full Circle cleaning brush

Full Circle cleaning brush (photo credit: Full Circle)

9. Shampoo bars and facial cleansing bars from Beauty and the Bees in Tasmania.  My favourite thing about these is that they don’t come packaged in plastic bottles but in recycled cardboard.  They are also palm oil free, which is rare in soap products  (in fact, any products), and they are natural, luxurious and gentle.

Beauty and the Bees shampoo bars

Beauty and the Bees shampoo bars (photo credit:beebeauty.com)

10. Let’s not forget the dunny (that’s toilet, if you’re not familiar with this Aussie colloquialism).  Frankly I don’t think our bottoms are that precious that they need to be wiped with virgin timber paper.  I always choose recycled paper toilet paper.  My preferred one is Safe, as it’s made from 100% recycled paper, is unbleached, housed in recycled paper packaging and made in Australia by an Aussie company.

Safe Toilet Tissue

Safe Toilet Tissue (photo credit: planetark.org)

I’m quite happy to promote products with such impeccable eco-credentials.  My list could go on quite a bit further.  The point is we can choose to make responsible purchases, because there are eco friendly options for just about everything you might want.  What are some of your favourite green products?

2 Comments

Filed under Living Green